
Setting up an iOS Simulator
Check your Xcode and macOS versions, install Appium, and start an iOS simulator session
Verify Xcode and Mac Operating System Versions
Xcode is an integrated development environment (IDE) designed by Apple for macOS. It provides a comprehensive set of tools and resources for software development. Make sure that you have the latest and compatible version of Xcode installed on your Mac. Upon installation, Xcode must be configured. Run the following command:
xcode-select --install
In this case, the macOS and Xcode versions are:
- macOS: Sonoma 14.2
- Xcode: 15:0:1
You can download the latest macOS version from your App Store depending on your processor. By default, Xcode will be pre-installed. Make sure to download the latest version from App Store using your Apple credentials. If you are unaware of the macOS compatibility, then you can search for Xcode in the App Store and look for the details in the What's New column.
Before installing Appium, you need to set up the prerequisites: Homebrew, Carthage, and Java. Follow the procedure described in the Setup and Configure Appium on Mac Operating System for iOS Devices.
Install Appium
To install Appium globally on your system, run the following command in the command line.
npm install -g appium@latest
If you want to install a specific version, you can run the npm install -g appium@ <version> command in the command line.
Verify Appium Installation
Upon installing Appium, you can access it from the command line by running the following command:
appium -v
The output verifies whether Appium is installed successfully and displays the appropriate version.
To verify the path, run the following command:
which appium
Diagnose and Resolve Common Node and iOS Configuration Issues
Perform the following to diagnose and address common configuration issues with Appium.
Install Appium Doctor
Begin by installing Appium Doctor by running the following command in the command-line prompt:
npm install appium-doctor -g
Install Appium Driver
Since version 2.0, all drivers have been isolated from the Appium server app and can be managed independently using the Appium driver command-line interface.
Install XCUITest Driver
XCUITest is the official UI testing framework provided by Apple for iOS. Appium uses the XCUITest Driver to communicate with and control your iOS app, allowing you to perform automated actions, such as tapping buttons, entering text, and verifying UI elements. This driver is specifically designed for iOS app automation.
To install the XCUITest driver, run the following command:
appium driver install xcuitest
Install Appium Inspector
Perform the following to install Appium Inspector for Appium 2.1.
Download and Install Appium Inspector
To download and install the latest version of Appium Inspector .dmg file, click here.
Once you download the file, double-click the DMG file to mount it to your Mac. You can now access the file through your desktop or Finder sidebar. After you mount the DMG file to your device, drag it to the Applications folder on your Mac. The file then copies itself into the folder with a lag time. When the file is fully moved into the Applications folder, you can open it from Spotlight or Launchpad program shortcuts.
Launch Appium Inspector
Open the application from your macOS Launchpad.

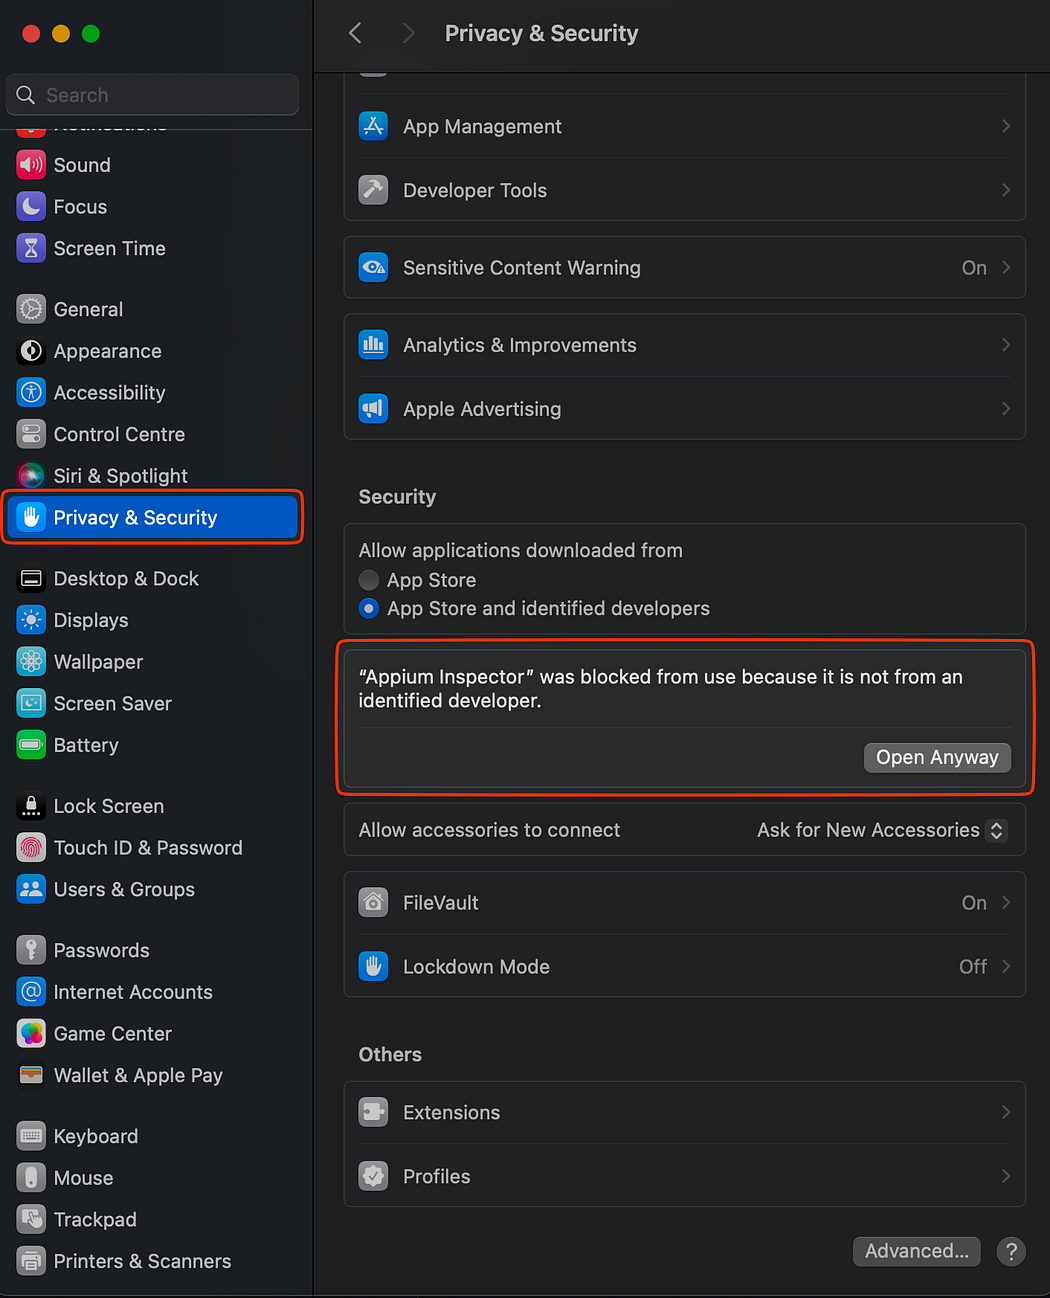
If the app fails to launch, try the following:
- Go to macOS Settings > Privacy & Security > Open Anyway.
Adding the Required Capabilities
In Appium, the required capabilities are provided in the Appium Inspector to specify the details and configuration of the mobile device or simulator that the Appium server should interact with during test automation. These capabilities include information such as the device name, platform name, platform version, app package, app activity, and other relevant settings.
Perform the following to add the required capabilities:
- Enter the appropriate Remote Path to view the desired capabilities.
- You can also view the capabilities in the JSON representation in the right pane. The JSON representation of capabilities in Appium provides a standardized, structured, and readable way to convey the configuration details needed for automated testing.

Verify Xcode Configurations
Make sure you have installed Xcode and Xcode command-line tools. Follow the procedure described in Setup and Configure Appium on Mac Operating System for iOS Devices.
Ensure That You Are Logged in with an Apple Account
Before proceeding with the Xcode configurations, make sure you are logged in with your Apple Developer account. To check, follow these steps:
- Open Xcode from Applications.
- In the menu bar, go to Xcode > Preferences.
- Under the "Accounts" tab, ensure that your Apple ID is listed and shows "Personal Team."
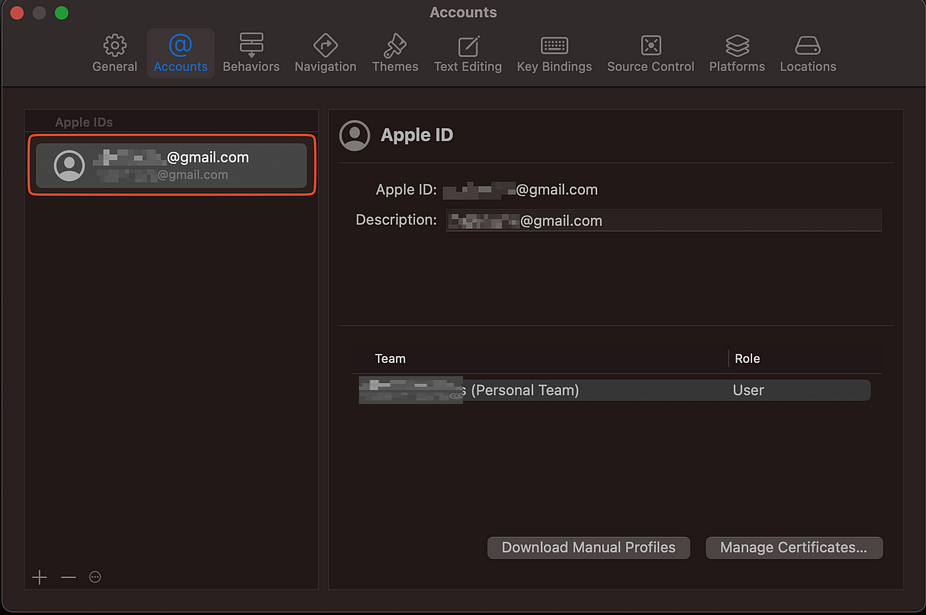
This is a crucial step for code-signing your apps and WebDriverAgent.
Configuring WebDriverAgent in the Simulator
- To install WebDriverAgent, refer to the Setup and Configure Appium on Mac Operating System article.
- To verify the configuration of WebDriverAgent, run the following command in the terminal:
git clone https://github.com/appium/WebDriverAgent.git
- Navigate to the WebDriverAgent directory:
cd WebDriverAgent
- Build and run the WebDriverAgent tests by running the following command:
xcodebuild build-for-testing test-without-building -project WebDriverAgent.xcodeproj -scheme WebDriverAgentRunner -destination 'id=56BF9C2F-DC97-401A-A1AA-F295FA8296A9' -allowProvisioningUpdates
This command is used to build and run tests for the WebDriverAgent project in Xcode without performing a full build of the entire project. It is a common practice in automated testing workflows to speed up the testing process by skipping unnecessary build steps.
Verifying the UDID Number
In this command, the unique identifier 56BF9C2F-DC97-401A-A1AA-F295FA8296A9 corresponds to a specific simulator or device, also called the UDID number. To locate the UDID number, navigate to Xcode, go to the Window menu, and select Devices and Simulators.
Confirm xcrun simctl Configuration
xcrun simctl is a command-line utility for interacting with the iOS Simulator.
In this step, xcrun simctl configuration is verified. This is an essential component for managing simulator runtimes and is crucial for the successful execution of Appium.
- Navigate to your terminal.
- Run the following command:
xcrun simctl
This command is used to manage the simulator and must display information about its usage. The following output is displayed:
usage: simctl [--set <path>] [--profiles <path>] <subcommand> ...
simctl help [subcommand]
Command line utility to control the Simulator
Prepare Your iPhone as a Simulator
On your iPhone, go to Settings > Privacy & Security > Developer Mode. Restart the device if required.

This ensures that your iPhone is recognized by Xcode and is ready for development and testing.