
Prerequisites for On-Premises Deployment
Set up the prerequisites and configure environment variables for deploying the on-premises algoQA Test Automation Platform. This includes ensuring algoScraper is in place and options to enable GenAI features.
Software and Hardware Requirements
- OS: Windows
- Processor (CPU): 2.4 GHz quad-core or higher
- Memory (RAM): 16 GB
- Storage: 250 GB SSD
Minimum Required: 50 GB of free disk space for the operating system and applications.
Recommended: 100 GB or more, depending on the volume of logs and data.
Network: 1 Gbps network interface.
Installations
Perform the following:
Install Node.js 22
- Download Node.js 22 from the official website: Node.js Download. Select the version compatible with your operating system from the dropdown list, then click the Download button.
- Run the downloaded installer and follow the installation instructions.
- Verify the installation by opening a command prompt and running the command
node -vto check the Node.js version.
Install Java 17
- Download Java 17 or the compatible version from the Oracle website: Java 17 Download.
- Run the downloaded installer and follow the installation instructions.
- Verify the installation by opening a command prompt and running the command
java -versionto check the Java version.
Install Python 3.11
- Download Python 3.11 or the compatible version from the official website: Python 3.11 Download.
- Run the downloaded installer and follow the installation instructions.
- Verify the installation by opening a command prompt and running the command
python --versionto check the Python version.
Install MySQL 8
- Download MySQL 8.4.3 or the compatible version from the MySQL website: MySQL 8.4.3 Download.
- Run the downloaded installer and follow the installation instructions.
- During the installation, set up a MySQL root password and remember it for future use.
Install MySQL Workbench
- Download MySQL Workbench 8 or the compatible version from the MySQL website: MySQL Workbench Download.
- Run the downloaded installer and follow the installation instructions.
- Launch MySQL Workbench after installation and configure it to connect to your MySQL server using the root password set during MySQL installation.
Install AWS CLI V2
- Before downloading and installing AWS CLI, ensure that your system has internet access. The AWS CLI installer requires internet connectivity to download the necessary files and dependencies.
- Download AWS CLI V2 from the AWS website: AWS CLI V2 Download.
- Run the downloaded installer and follow the installation instructions.
- Verify the installation by opening a command prompt and running the command
aws --versionto check the AWS CLI version. - If credential verification fails, run
aws configurein a command prompt. - When prompted, replace the placeholder with the actual values for the following:
aws_access_key_id=<PLACEHOLDER>aws_secret_access_key=<AWS_SECRET_ACCESS_KEY>region=ap-south-1output=json
Install MongoDB and Set Up MongoDB on Windows
-
Download MongoDB Community server from the website: mongodb.com or install using MSI installer from here.
-
During installation, check the Install MongoDB Compass checkbox. If it is already checked, Compass will be installed automatically. Otherwise, download and install it separately from here.
-
Setup the environment variable path:
- After installation, navigate to the respective MongoDB folder path and copy the path to the bin folder. (e.g., C:\Program Files\MongoDB\Server\7.0\bin)
- Search for "Environment Variables" in the Windows search bar and select "Edit the system environment variables."
- In the System Properties window, click on "Environment Variables."
- In the Environment Variables window, under "System variables," select the "Path" variable and click "Edit."
- Add the path copied into system variable path.
- Click OK to confirm the changes.
-
Download the mongo shell
Download mongo shell from the website: mongodb.com or follow the installation instructions to install mongo shell from here.
-
Open the command prompt from the same folder path where you have installed mongo shell.
-
Verify the installation by running the following command and pressing Enter.
mongod --version -
Connect to MongoDB by running the following command and pressing Enter.
mongosh -
After connecting to the database, run the following command and press Enter to display a list of available databases.
show dbs -
Create a database by running the
create dbcommand. -
Manage database and user management by switching to a specific database by running the
use <dbname>command. -
Create a user with a password by running the following commands:
- db.createUser({user:"
<username>", pwd:"<password>", roles: []}). This command creates a new user with the specified username and password and assigns an empty set of roles. - db.auth("
<username>", "<password>"). This command verifies the user's identity using the supplied credentials.
- db.createUser({user:"
-
Configure the backend .env file: After generating MongoDB credentials, add them to your backend .env file. Include the following variables:
MONGO_DATABASE_HOST: MongoDB server's host address.DATABASE_MONGO_USER: Username for MongoDB database access.MONGO_DATABASE_NAME: Name of the MongoDB database.DATABASE_MONGO_PASSWORD: Password associated with the MongoDB user.
Note: Ensure that you have administrative privileges on your Windows machine to install the software components.
Deployment Procedure
algoQA Web App Component Deployment
This procedure provides instructions for setting up the algoQA web app component on a local machine.
Perform the following:
- Create a folder named 'AlgoQA' in the AWS S3 bucket.
- Download the algoQA build and copy all the required files into the AlgoQA folder.
- Open the command prompt outside of the created folder and run the following command to verify if the setup is successful: aws s3 cp s3://algoqa-custom-specific-deployment/
<path>AlgoQA --recursive. For example, C:\Users\Administrator> aws s3 cp s3://algoqa-custom-specific-deployment/windows/2024-03-21/23-33-43/AlgoQA/AlgoQA --recursive - Configure the .env file
- Create a .env file in the AlgoQA folder.
- Update the .env file with the necessary configuration values for deploying the AlgoQA Web App component.
- Open the .env file and replace the actual values for the PLACE_HOLDER with the appropriate values:
SECRET_KEY="PLACE_HOLDER"
JWT_EXPIRY=3600
AWS_REGION="ap-south-1"
PORT=4000
JAVA_URL="http://localhost:8080"
PY_URL="http://127.0.0.1:8083"
AWS_S3_ENABLED=""
AWS_BUCKET=""
baseURL="PLACE_HOLDER"
MONGO_ENABLE="true"
projectBasePath="../AlgoQA_Data"
dataPath="AlgoQA_Data"
DATABASE_HOST_CLIENT="PLACE_HOLDER"
DATABASE_PORT_CLIENT=3306
DATABASE_USER_CLIENT="PLACE_HOLDER"
DATABASE_PASSWORD_CLIENT="PLACE_HOLDER"
DATABASE_NAME_CLIENT="PLACE_HOLDER"
IS_LOCAL="true"
DATABASE_HOST="PLACE_HOLDER"
DATABASE_PORT=3306
DATABASE_USER="PLACE_HOLDER"
DATABASE_PASSWORD="PLACE_HOLDER"
DATABASE_NAME="PLACE_HOLDER"
MONGO_ENABLE_DASHBOARD="true"
MONGO_DATABASE_HOST="PLACE_HOLDER"
DATABASE_MONGO_USER="PLACE_HOLDER"
MONGO_DATABASE_NAME="PLACE_HOLDER"
DATABASE_MONGO_PASSWORD="PLACE_HOLDER"
BACK_UP_THROUGHPUT=4
START_WORKER=""
NODE_ENV="build"
FILE_ENCRYPTION_KEY="PLACE_HOLDER"
INHOUSE_ACCESS="true"
- Configure the backend .env file: After generating MongoDB credentials, add them to your backend .env file. Include the following variables:
- MONGO_DATABASE_HOST: MongoDB server's host address.
- DATABASE_MONGO_USER: Username for MongoDB database access.
- MONGO_DATABASE_NAME: Name of the MongoDB database.
- DATABASE_MONGO_PASSWORD: Password associated with the MongoDB user.
- Setting Up the Database: To provide pre-defined data into user database tables for local deployment, perform the following:
- Afframeworks: This table stores information about the frameworks that can be used within the application. Provide data based on your requirements. Include framework names, versions, and any other relevant details.
- Aflanguagess: This table stores information about the programming languages. Populate based on your requirements
- applicationtypes: This table stores information about the programming languages used in the application. Populate this table based on your requirements. Include language names, versions, and any other relevant information.
- behaviour_action
- business_unit: This table stores information about the business units or divisions in your organization. Populate this table based on your requirements. Include business unit names, descriptions, and any other relevant information.
- control_type_list
- customers
- default_action_list
- new_action_list
- roles
- subscription_mode
- subscription_type
- user_permission
- Create the SpringbootUP.bat File.
- Create a SpringbootUP.bat batch file in the AlgoQA folder
- Update the SpringbootUP.bat file with the client database details inside the AlgoQA folder:
cmd /k java -jar -Ddburl=<<PLACE_HOLDER>>:3306/<<PLACE_HOLDER>> -Dusername=<<PLACE_HOLDER>> -Dpassword=<<PLACE_HOLDER>> algoqa_springboot_api.jar
- When generating the scripts, you must download the required attachments and code snippets. This includes: algoAF_attachments and codeSnippets of the scripts. Perform the following:
- Create a subfolder named AlgoQA-Data within AlgoQA.
- Open a command prompt.
- Navigate to the directory where you want to save the files. For example, AlgoQA/AlgoQA_Data/. Use the AWS CLI aws s3 cp command to download the algoAF_attachments folder:
aws s3 cp s3://algoqa-custom-specific-deployment/AlgoQA_Data/algoAF_attachments algoAF_attachments --recursive- Use the AWS CLI aws s3 cp command to download the codeSnippet folder:
aws s3 cp s3://algoqa-custom-specific-deployment/AlgoQA_Data/codeSnippet/ codeSnippet --recursive.
The AlgoShack team shares the above S3 bucket details and command.
Starting the algoQA Web App Component
This procedure explains how to start three different applications for the algoQA platform:
Starting these applications initializes the algoQA platform, enabling it to handle user requests and perform its functions.
To open three command prompts and start each application in a separate prompt, perform the following:
- Open the first command prompt
- Use the Windows search bar to search for "Command Prompt."
- Click on "Command Prompt" to open it.
- Navigate to the directory containing the algoQA Node application: For example, path\to\AlgoQA.
- Start the algoQA Node application in the first command prompt: Run the following commands When internet access is unavailable, Perform the following:
- Check if the node_modules folder is there inside the AlgoQA directory. If the folder doesn't exist, then run the following AWS CLI command to download node_modules.zip file.
aws s3 cp s3://algoqa-custom-specific-deployment/node_modules.zip AlgoQA - Unzip the downloaded file.
- Start the application by running the following command:
npm start— This command will execute the startup script defined in your project's package.json file and launch the application. When internet access is available, Perform the following to manage and start your application using pm2, a process manager for Node.js applications: - Install npm if not already installed by running the following command:
npm installnpm install pm2 -g— This command installs pm2 globally on your system, allowing you to use it from any directory. - Start the application using pm2:
pm2 start process.json
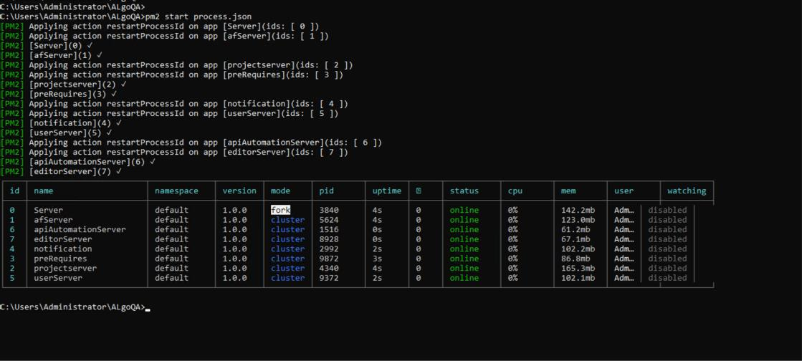
- Open the second command prompt:
- Repeat step 1 to open another command prompt.
- Navigate to the directory containing the AlgoQA application: For example, path\to\AlgoQA.
- Start the algoQA Spring Boot application in the second command prompt: Run the following command:
SpringbootUP.bat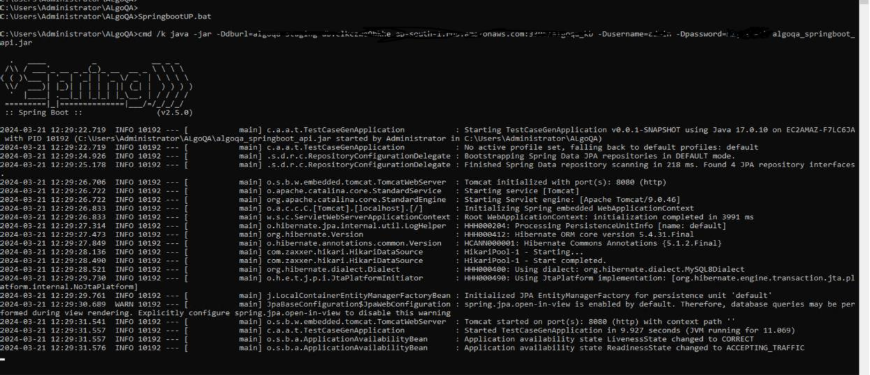
- Open the third command prompt:
- Repeat step 1 to open another command prompt.
- Navigate to the directory containing the AlgoQA application, For example, path\to\AlgoQA.
- Start the AlgoQA Python application in the third command prompt: Run the following command:
autogen.exe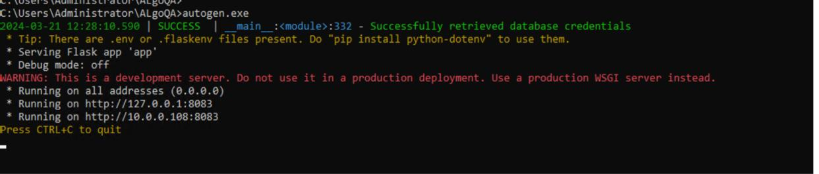
- Each command prompt will now be running a different algoQA application.
On-Premise Deployment of algoScraper with GenAI Capabilities
Deployment using AWS Bedrock
algoScraper includes built-in integration with AWS Bedrock. The Large Language Models (LLMs) used by algoScraper are deployed via the AWS Bedrock service. To learn more about algoScraper, refer to algoScraper as an Extension for Web Applications.
Pre-requisites:
Whitelist the following domains:
- bedrock.ap-south-1.amazonaws.com
- bedrock-runtime.ap-south-1.amazonaws.com
- secretsmanager.ap-south-1.amazonaws.com
- Protocol: HTTPS
- Port: 443
- (Optional) Reference IPs from: https://ip-ranges.amazonaws.com/ip-ranges.json
- Filter by region: ap-south-1
- Services: BEDROCK, SECRETSMANAGER
Deployment without using AWS Bedrock
LLMs hosted on-prem can be integrated with algoScraper.
Pre-requisites:
- Availability of a 7B or above LLM variant. Ideally, instruct models from Mistral or Llama (Meta)
- An API endpoint to access these models with request and response schema.
Once the pre-requisites are met, a customized algoScraper extension build will be provided.
algoQA GenAI Integration and Deployment Overview
algoQA is an intelligent test automation platform that integrates Generative AI (GenAI) features to accelerate test design and script execution. These GenAI capabilities are powered exclusively by Amazon Bedrock, leveraging foundation models (FMs) to ensure performance, scalability, and enterprise-grade security and compliance.
Architecture:
- LLM Provider: Amazon Bedrock
- Model Usage: Uses foundation models (e.g., Mistral, Meta Llama, Amazon Nova) via AWS Bedrock APIs.
- Data Handling: No fine-tuning or training is performed. All prompts are stateless and transient, ensuring zero data retention. This stateless interaction ensures enterprise-grade security and compliance.
- Frontend & API Gateway: algoQA UI communicates with a secure backend, which mediates interactions with the LLM services through authenticated Bedrock endpoints.
Deployment Models
- SaaS Deployment (Recommended):
- Hosted and fully managed on our secure AWS infrastructure.
- GenAI features work out-of-the-box.
- Fully managed infrastructure and updates.
- No LLM setup or networking requirements on the client side.
- On-Premises Deployment:
- Customers may host algoQA in their own infrastructure.
- GenAI support is limited unless specific network and model compatibility conditions are met.
- Default on-premises installations disable GenAI unless network access to our AWS Bedrock domain is allowed.
Options to have GenAI features for on-premises Deployment
| S.N. | Option | Description |
|---|---|---|
| 1 | algoQA Bedrock Domain Whitelisting | The customer's firewall or VPC must allow outbound HTTPS access to our Bedrock endpoints. |
| 2 | Provide Matching AWS Infra | A dedicated Bedrock-enabled AWS account/environment must be configured and accessible to algoQA. |
| 3 | Customer-Hosted Equivalent Models (Unsupported) | While some customers claim to have identical models, we do not support deploying or maintaining customer-hosted LLMs due to variability in model quality, runtime behavior, quantization, API compatibility, etc. |
Key Considerations:
- algoQA does not commit to deploying or managing LLMs on customer infrastructure.
- If GenAI access is unavailable, relevant features degrade gracefully or remain disabled, without affecting core algoQA functionality.
- Customer test data never leaves their infrastructure (if using on-prem + Bedrock access).
RabbitMQ Installation, Architecture & Developer Guide
Windows Installation
Step 1: Install Erlang OTP
RabbitMQ is built on the Erlang runtime. You must install Erlang before RabbitMQ can run.
- Navigate to the official Erlang OTP patch page: https://www.erlang.org/patches/OTP-27.3.4.11
- Download the Windows installer (.exe) for OTP version 27.
- Run the installer with administrator privileges and follow the setup wizard.
- Verify Erlang is available by opening a Command Prompt and running:
erl -version
Step 2: Install RabbitMQ
- Visit the official RabbitMQ Windows installation page: https://www.rabbitmq.com/docs/install-windows
- Scroll to the Direct Downloads section and download the latest RabbitMQ
.exeinstaller. - Run the installer with administrator privileges.
- The RabbitMQ Windows Service will be registered and started automatically.
Step 3: Enable the Management Plugin
- Open the RabbitMQ Command Prompt from the Start menu.
- Enable the plugin:
rabbitmq-plugins.bat enable rabbitmq_management
- Verify enabled plugins:
rabbitmq-plugins.bat list
- Restart the service to apply changes:
net stop RabbitMQ
net start RabbitMQ
Step 4: Access the Dashboard
Open http://localhost:15672/.
Default Port: Port 15672 is the default RabbitMQ Management UI port. Ensure it is not blocked by your firewall.
Log in using the default credentials:
| Field | Value |
|---|---|
| Username | guest |
| Password | guest |
| Dashboard URL | http://localhost:15672/ |
Security Notice: The guest account is restricted to localhost only. For production, create a dedicated user with strong credentials and set JOB_API_KEY.