
Automating Test Cases using TestComplete Framework with Python
This topic introduces you to the TestComplete automation framework, guiding you through the process of creating, managing, executing, and maintaining test case scenarios leveraging the algoQA automation process.
Prerequisites
To install TestComplete, see TestComplete Installation guide.
About TestComplete Framework
Currently applicable for: Desktop Application
TestComplete is an automated testing environment suitable for various application types and technologies, including Windows, Linux and Mac. It supports TestComplete and comes with built-in capability to utilize the Python language.
Use case
This use case demonstrates the automation of a Calculator application by integrating algoQA with the TestComplete framework using the Python language. The example showcases an in-sprint automation process, automating the steps of adding two numbers and verifying the sum.
Test Design
Designing tests is creating an offline model of an application under test (AUT), which involves mimicking a UI model of an AUT using nodes, features and UI elements. For more information, see Profiling.
Using the TestComplete Object Spy Feature
To identify objects within your application for use in your test steps, you can use the TestComplete Object Spy feature. In this example, the calculator application is used to illustrate the process.
Follow these steps to prepare your application for automation testing and utilize the Object Spy.
- Launch the TestComplete tool from your desktop and click the Object Spy toolbar button as follows:

- The Object Spy window appears as shown:

- Determine the application you wish to inspect, and the application tab will display the current screen you intend to inspect. Similarly, you can identify all the necessary objects required.
- Mouse over the required object to inspect the element, and the selected element will be highlighted. All the properties will be displayed in the Properties tab. Choose the required attribute to locate the element.
- Navigate to Test Design and Controls to update the locator. You can update the locator fetched from the Object Spy tool and save it. Similarly, update all the locators required for the objects.
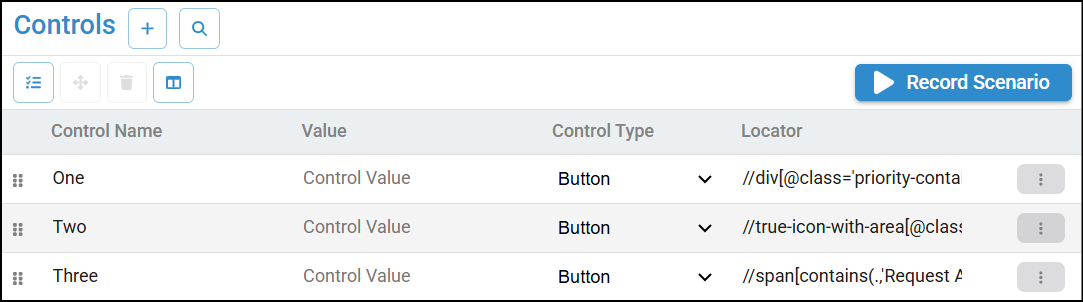
Record the scenarios using Record Scenario feature
The Record Scenario feature is used to record and save the workflow or scenario or use case. The scenario will be saved in the same sequence it has been recorded.
Note: Recording for the Record Scenario feature is done in an offline model. It doesn't interact with the live application.
For more information, see Profile a Desktop Application section in the profiling article.
Editing Object Repository File
The Object Repository file is a spreadsheet with all the UI elements or control details.
It contains the Object Repository file and its contents:

| Field | Description |
|---|---|
| Control Name | Displays all the UI element/control names that were recorded in the scenario |
| Locator | Displays the locators to find the UI elements |
| Control Type | Displays the control types used to describe the nature and purpose of the UI elements |
| Control Identification Type | Displays the locator type of the UI element |
| Feature Name | Displays the feature name |
| Page Name | Displays the page name |
To edit the Object Repository file: After selecting a Project, navigate to Left Pane > Object Repository and update the required field in the Object Repository file and save the details.
Generating Test Cases and Test Scripts
This section helps you generate test cases and test scripts. Check Generate Test Cases and Test Scripts to generate scripts.
Execution of the scripts
When using TestComplete with algoQA, the generated test scripts will be stored in the same Test Scripts folder. You can download this script to your local machine to import this script into the TestComplete tool in the respective environment. This algoQA-generated script will work as a TestComplete project.
Tip: In the TestComplete script folder, double-click the project suite file with the extensions, such as .mds and .pjs to open the entire scripts in TestComplete.
After opening the scripts in TestComplete, you can review all the respective files related to the Python TestComplete framework before execution.
Execution Options
You can execute scripts in two ways:
-
Using Feature Files: Open the respective Feature File which you want to execute in TestComplete. You can either execute a single scenario or an individual step by right-clicking on the respective scenario outline or an individual step. You can also execute the whole Feature File by right-clicking on the respective file without opening it.
-
Using Command Prompt: Alternatively, you can execute scripts using the command prompt, providing command-line instructions to run your tests. This command will launch the TestComplete framework and start executing defined tags by opening the project with the help of the path mentioned as follows.
Command line syntax example:
The following command runs TestComplete, loads the MySuite.pjs project suite, commands TestComplete to execute the test items of the TestComplete project and updates the test results.
TestComplete.exe "D:\script_folder
ew script\TestComplete.pjs" \p:TestComplete \tags:"@tagname" \r
The following table represents command-line arguments:
| Key                    | Description                                                                                                                                                                                            |
| ---------------------- | ------------------------------------------------------------------------------------------------------------------------------------------------------------------------------------------------------ |
| \*D: \script\_folder\* | Specifies the path where the script is located                                                                                                                                                         |
| _\TestComplete.pjs_    | Specifies the file name that launches the TestComplete framework and loads the specified project (.mds file) or project suite (.pjs)                                                                   |
| _\p: project\_name_    | Specifies the project name                                                                                                                                                                             |
| _\tags: "@tag\_name"_  | Specifies the test case name, which corresponds to the tag assigned to the test case in the feature file. In the TestComplete tool, you can execute all those scenarios under this specified tag name. |
| \r                     | Commands TestComplete to execute tests provided by the project suite                                                                                                                                   |